Intake Form
Intake Form
Intake Form
Intake Form
Intake Form

Steps to Author Image-Text Component: 

Step 1: Click on drag components here, and click on + icon to add the component on page.

Step 2: Search and select image text component from dropdown list and then drag and drop it onto the desired location on the page.

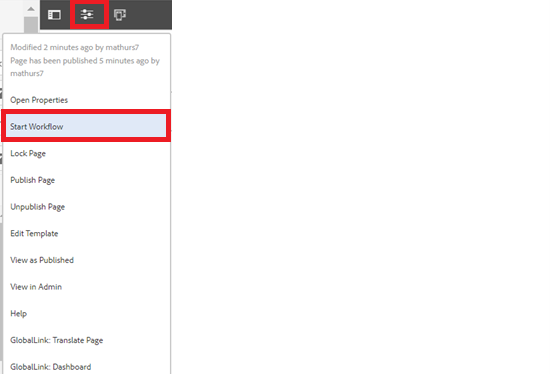
Step 3: Click on the highlighted icon to configure the component. 

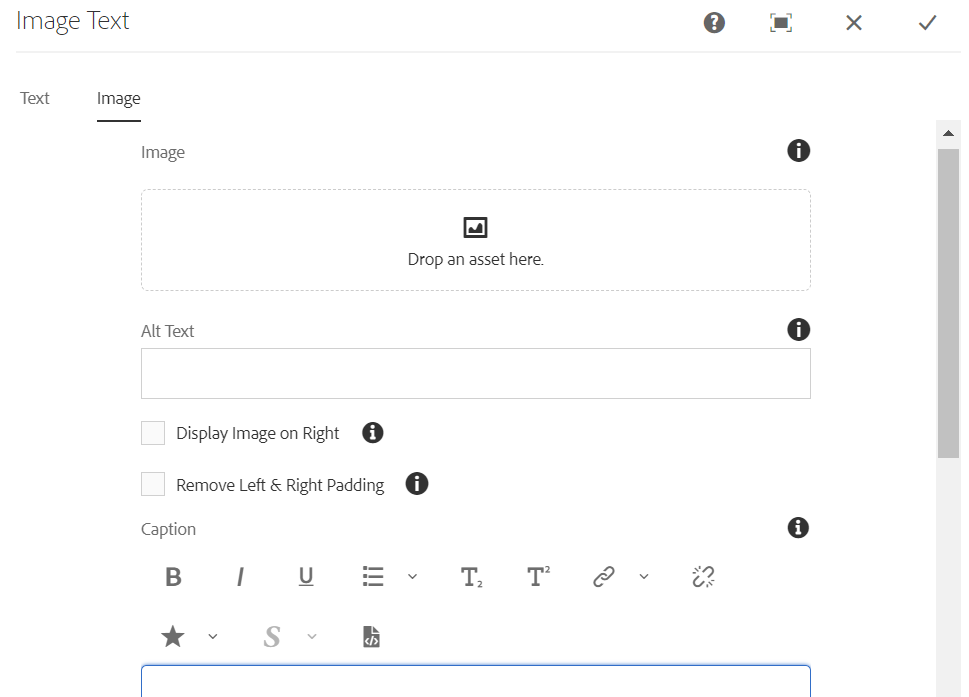
Step 4: Author the image and text tabs as shown.(For variation 1)

Authoring Fields - Variation 1

Authoring Field name Description
Text tab
Variation

Variation is a dropdown field with two different options.

  • Variation 1 - If selected, user will be able to text and title fields in Text Tab and image,alt text,display image,remove padding and caption fields in Image Tab
  • Variation 2 - If selected, user will be able to see text field in Text Tab and image and alt text in Image Tab
Title

It will be title authoring field to display the text.

  • Text can be styled (bold, italics, and underline).
  • Text can be aligned (left, center, right).
  • Lists and hyperlinks can be added. 
  • HTML source edit can be added to text.
  • Superscript, subscript, and footnotes are supported.
  • If the user wants to have space within the lines, then while inserting text “ENTER” can be used. This will insert a <p> tag in rich text.
  • If the user wants to have no space within the lines, then while inserting text “SHIFT + ENTER” can be used. This will insert a <br> tag in rich text with no extra space.
Text

It will be text authoring field to display the text.

  • Text can be styled (bold, italics, and underline).
  • Text can be aligned (left, center, right).
  • Lists and hyperlinks can be added.
  • HTML source edit can be added to text.
  • Superscript, subscript, and footnotes are supported.
  • If the user wants to have space within the lines, then while inserting text “ENTER” can be used. This will insert a <p> tag in rich text.
  • If the user wants to have no space within the lines, then while inserting text “SHIFT + ENTER” can be used. This will insert a <br> tag in rich text with no extra space.
Image tab
Image Image can be authored from dam that needs to be displayed.
Display image on right Checkbox, if checked, will display image on right. By default image will be left aligned.
Remove Left and Right Padding Checkbox, if checked padding will be removed.
Caption Rich Text Field to add Image Caption which will be displayed below the Image.

 Author the image and text tabs as shown.(For variation 2)

Authoring Fields - Variation 2

Authoring Field name Description
Text tab
Variation

Variation is a dropdown field with two different options.

  • Variation 1 - If selected, user will be able to text and title fields in Text Tab and image,alt text,display image,remove padding and caption fields in Image Tab
  • Variation 2 - If selected, user will be able to see text field in Text Tab and image and alt text in Image Tab
Text

It will be text authoring field to display the text.

  • Text can be styled (bold, italics, and underline).
  • Text can be aligned (left, center, right).
  • Lists and hyperlinks can be added.
  • HTML source edit can be added to text.
  • Superscript, subscript, and footnotes are supported.
  • If the user wants to have space within the lines, then while inserting text “ENTER” can be used. This will insert a <p> tag in rich text.
  • If the user wants to have no space within the lines, then while inserting text “SHIFT + ENTER” can be used. This will insert a <br> tag in rich text with no extra space.
Image tab
Image Image can be authored from dam that needs to be displayed.
Alt Text
Alternative text for the image

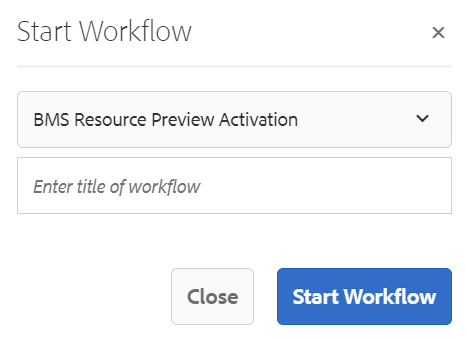
Step 5: After authoring all the fields, start workflow as shown below.
  • Select BMS Resource Preview Activation from the dropdown.
  • We can select appropriate title for the workflow and click on start workflow.
  • This will publish the page in preview environment and reviewers can review the page in preview instance.

Desktop View:

Image Text Component authored without image

Text Description can be authored here

  • First Level Bullet
    • Second Level Bullet
      • Third Level Bullet
alt

Example: Image-text component

Image will be displayed at left by default

alt

Example: Image-text component

Image to be displayed at right

alt-text

Example: Image-text Component V2 Variation

Image will be display at left all time